!Let Us HELP YOU!
We have a lot of curated content on this blog.
Take this simple 20 second Quiz to Help You
Find The Exact Content You Are Looking For!
Simon Sherbourne from Avid Pro Tools demonstrates a quick, practical walkthrough that shows how to move from an empty session to a shareable beat in just over ten minutes.This article was created using the video Pro Tools Intro: Creating a Beat in 10 Minutes as a primary source of reference. The content has been curated and expanded upon with additional insights and experiences of my own. I wanted to ensure that the original video receives proper attribution, as it served as valuable source material in helping me craft this article. This step‑by‑step guide is tailored for producers who want a fast, clear introduction to building a track using loops, virtual instruments, simple editing and basic effects. It’s ideal for Pro Tools For Beginners who prefer a hands‑on approach and want to learn efficient workflow habits right from the start.
Table of Contents
- Overview: What this guide covers
- Why this approach works for Pro Tools For Beginners
- 1. Session setup and essential preferences
- 2. Importing loops: fast sketching using samples
- 3. Arranging loops and simple duplication techniques
- 4. Adding flair: tape stop effect with AudioSuite
- 5. Creating a drum track using Expand (virtual instrument)
- 6. Recording drums: MIDI performance and quick edits
- 7. Adding character: harmonic and EQ plugins
- 8. Crafting a sub bass with Expand
- 9. Structure and arrangement: creating space for vocals
- 10. Exporting and next steps
- Resources and recommended reading
- Practical checklist for Pro Tools For Beginners
- Common mistakes and how to avoid them
- Frequently asked questions
- Final thoughts for Pro Tools For Beginners
Overview: What this guide covers
This article walks through the exact process used to create the beat: session setup; importing and arranging loops; creating a drum kit using the Expand instrument; recording MIDI with a keyboard; editing and quantizing parts; adding character with harmonic and EQ plugins; layering a sub bass; and arranging sections that could be handed off to a vocalist. It emphasizes practical tips and shortcuts that speed up the creative process, which is crucial for anyone getting started with Pro Tools For Beginners.
Why this approach works for Pro Tools For Beginners
Starting with pre-made loops and then layering virtual instruments is an ideal path for Pro Tools For Beginners because it reduces decision fatigue early in the session. By anchoring the tempo with a loop and using the included Expand instrument for drums and bass, a producer can rapidly sketch arrangement ideas. The workflow shown is useful whether the user is producing electronic beats, hip‑hop, pop or R&B.
1. Session setup and essential preferences
Before adding any sounds, the instructor enables a few settings that make music production faster and more predictable:
- Dynamic Transport — allows a playback range and position that won’t interfere with edit selection, perfect for looping a section while editing elsewhere.
- MIDI Merge — enables overdubbing MIDI parts without erasing previously recorded data, handy for building complex drum parts or layered synths.
- Edit Command Focus — enables single‑key shortcuts such as R and T for zooming, which saves a lot of time when navigating the edit window.
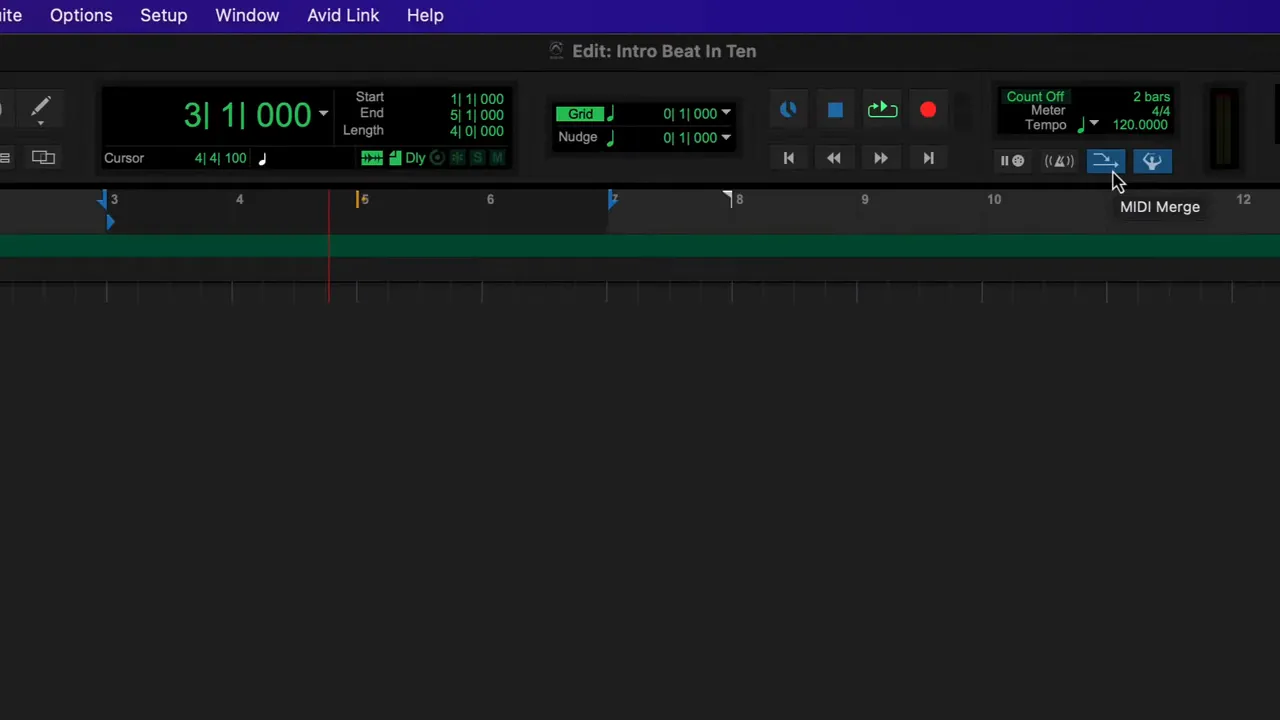
These settings are small adjustments that greatly accelerate the Pro Tools For Beginners learning curve by reducing the number of context switches and mouse clicks required while composing.
2. Importing loops: fast sketching using samples
Pro Tools ships with a substantial loop library (the video mentions a 2GB Loopmasters library), and additionally, it’s easy to import third‑party samples. The instructor uses a couple of loops from an online sample service and drags them straight into the edit timeline. This is the fastest way to build a musical foundation.
Key tips for Pro Tools For Beginners when importing loops:
- Set the project tempo to match your loops (for example, 140 BPM in the demonstration) to make later edits and MIDI overlay simpler.
- Drag a sample into empty timeline space — Pro Tools will automatically create a new stereo track for a loop.
- Use the O key as a shortcut to set the playback range to the selected edit range; it speeds up auditioning loops in context.
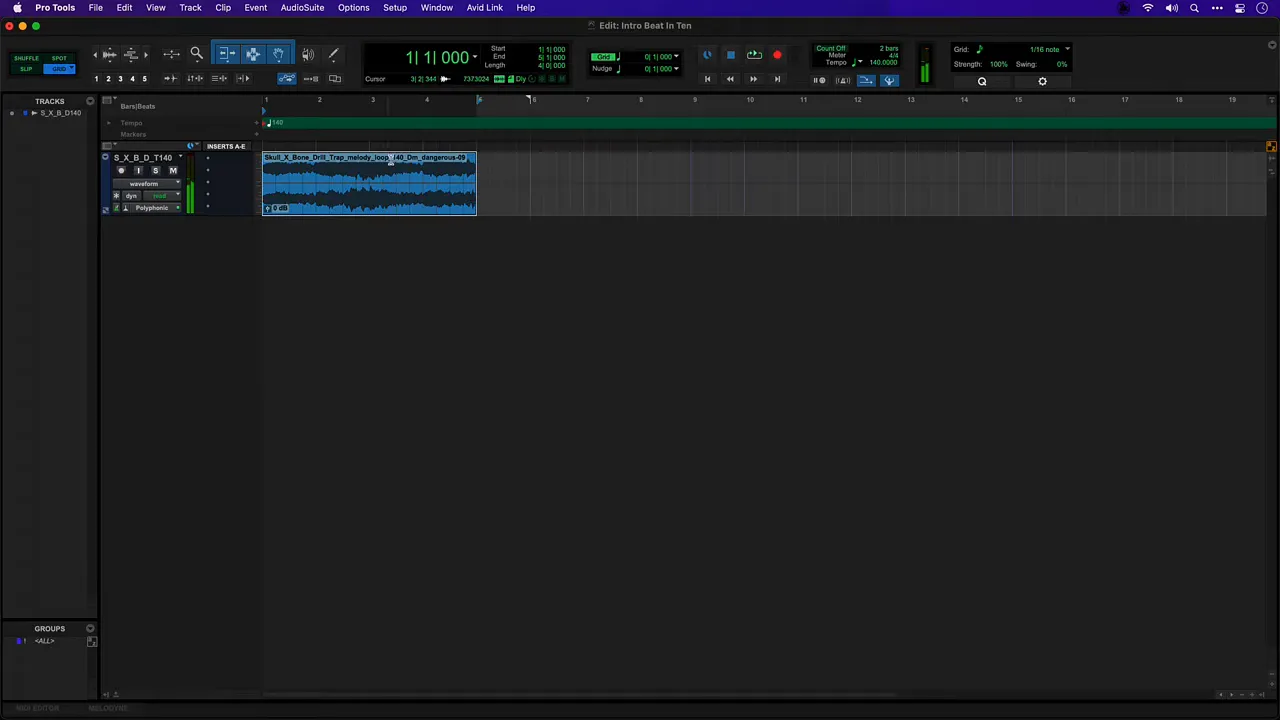
Pro Tools For Beginners should also learn the clip gain control early: it’s faster than using the mixer for rough level adjustments and preserves headroom while arranging.
3. Arranging loops and simple duplication techniques
With a couple of loops in place, the instructor composes a basic structure: start with one loop for the intro, then introduce the second loop after four bars for variety. Simple duplication and option‑drag copying quickly creates the initial form of the beat.
- Use Command-D (Mac) or Control-D (Windows) to duplicate a selection quickly.
- Option‑drag (Mac) or Alt‑drag (Windows) copies clips in place, which is an intuitive way to build a repeating pattern.
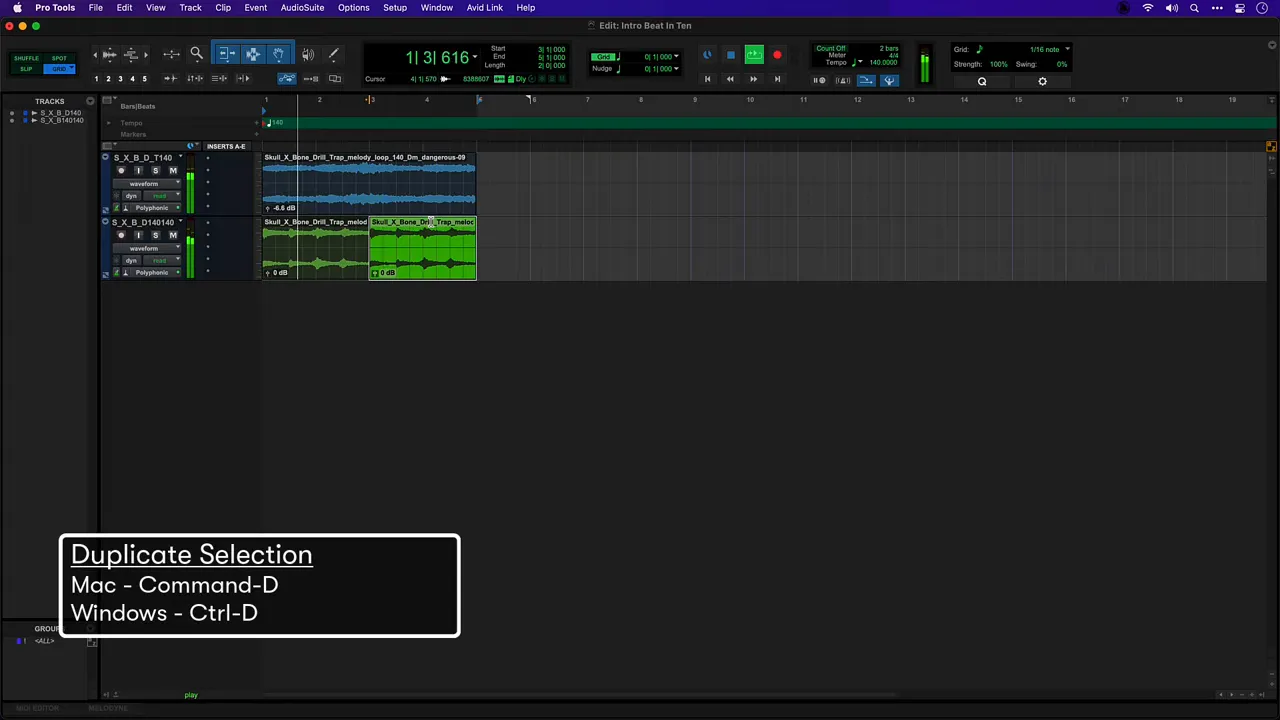
For Pro Tools For Beginners, becoming comfortable with selection and duplication accelerates creative experimentation.
4. Adding flair: tape stop effect with AudioSuite
To make a transition more interesting, the instructor applies a tape stop effect to one beat using the AudioSuite pitch‑shift module. AudioSuite processes individual clips non‑destructively (rendered to new audio), which is great for single‑clip edits such as stutters, stops or pitch effects.
WEBSITE RESOURCES FOR MUSICIANS
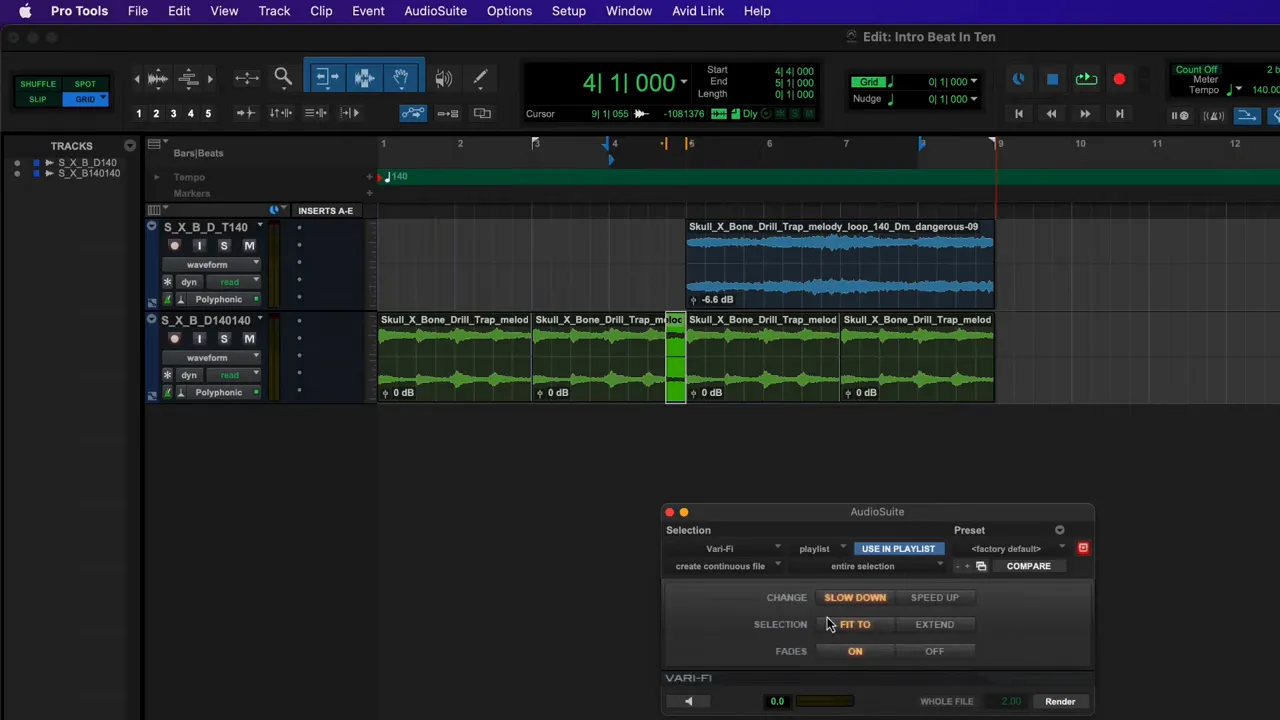
How to replicate the tape stop effect:
- Select the clip or the range of audio you want to affect.
- Open AudioSuite > Pitch Shift (or similar plugin) and choose a preset that slows down to stop the selection.
- Verify the preview, then click Render.
This effect adds ear‑catching interest at the start of a track — a useful tip for producers trying to craft memorable intros.
5. Creating a drum track using Expand (virtual instrument)
Instead of dragging in drum samples, the instructor creates an Instrument track and loads Expand (Expand 2 in the example) as an insert. Expand is a multi‑purpose sound module with presets that include drum kits, synths and acoustic instruments.
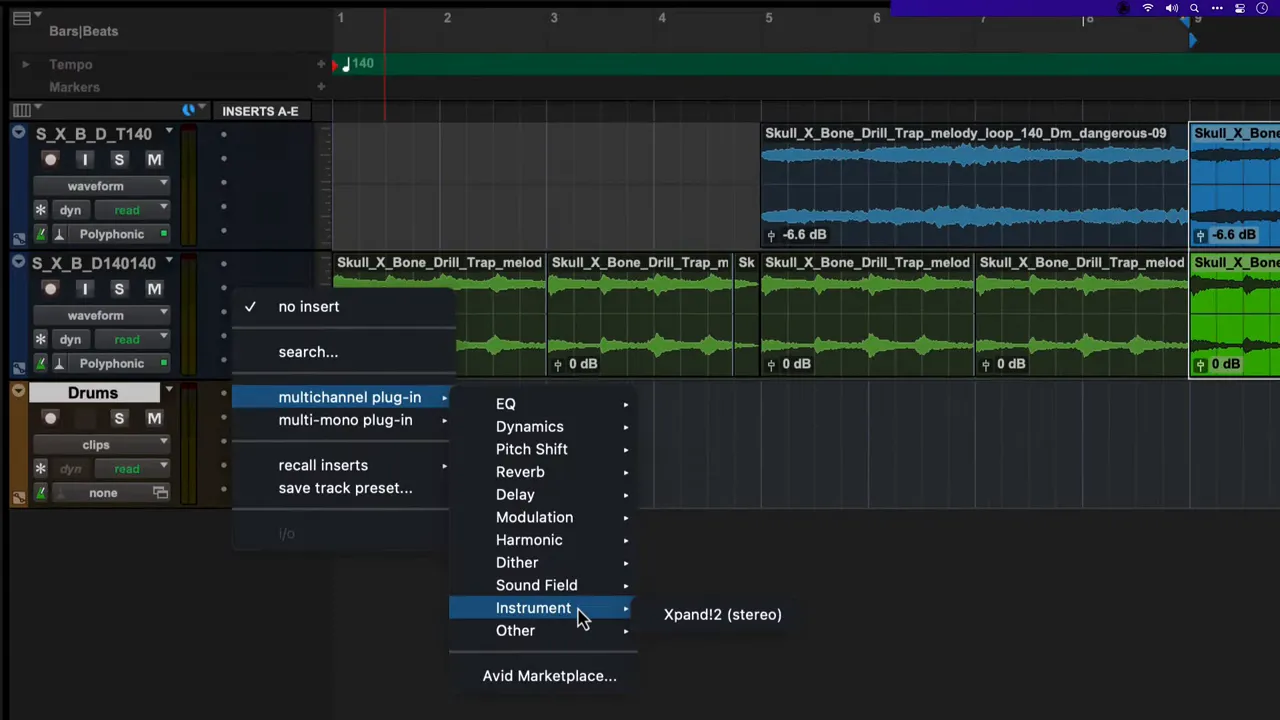
Steps to set up Expand for drums:
- Create a new Instrument track from the Track menu and name it (for example, “Drums”).
- Insert Expand into the first plugin slot of that track (Instruments → Expand 2).
- Choose a drum kit preset (the demo uses “Gated Hip Hop”).
- If a MIDI keyboard is available, arm the track and play to audition sounds; otherwise use the on‑screen MIDI keyboard.
For Pro Tools For Beginners, Expand is an excellent shortcut to a wide palette of sounds without importing separate sample libraries. The instructor highlights three sounds to start: kick, clap and hats — all of which are tweaked inside Expand for tone and space.
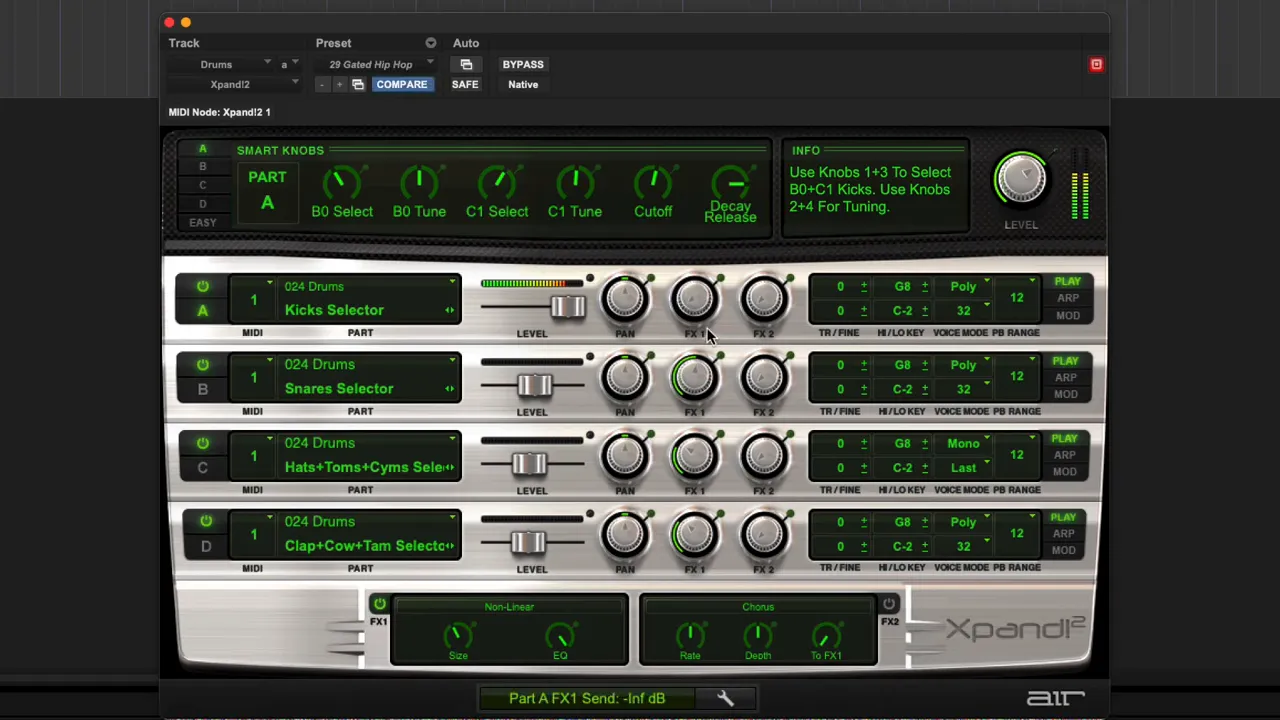
Typical adjustments made to kit layers:
- Remove or reduce preset reverb to tighten the sound.
- Tune the kick down for sub weight or tune the clap up to make it snappier.
- Add modulation (chorus) or other effects to hats to create movement.
6. Recording drums: MIDI performance and quick edits
With the drum track armed, the instructor records a few passes using F12 to record and Z to undo mistakes. For Pro Tools For Beginners it’s important to know how simple it is to record, audition, undo and re-record — this encourages a performative approach rather than over‑editing from the outset.
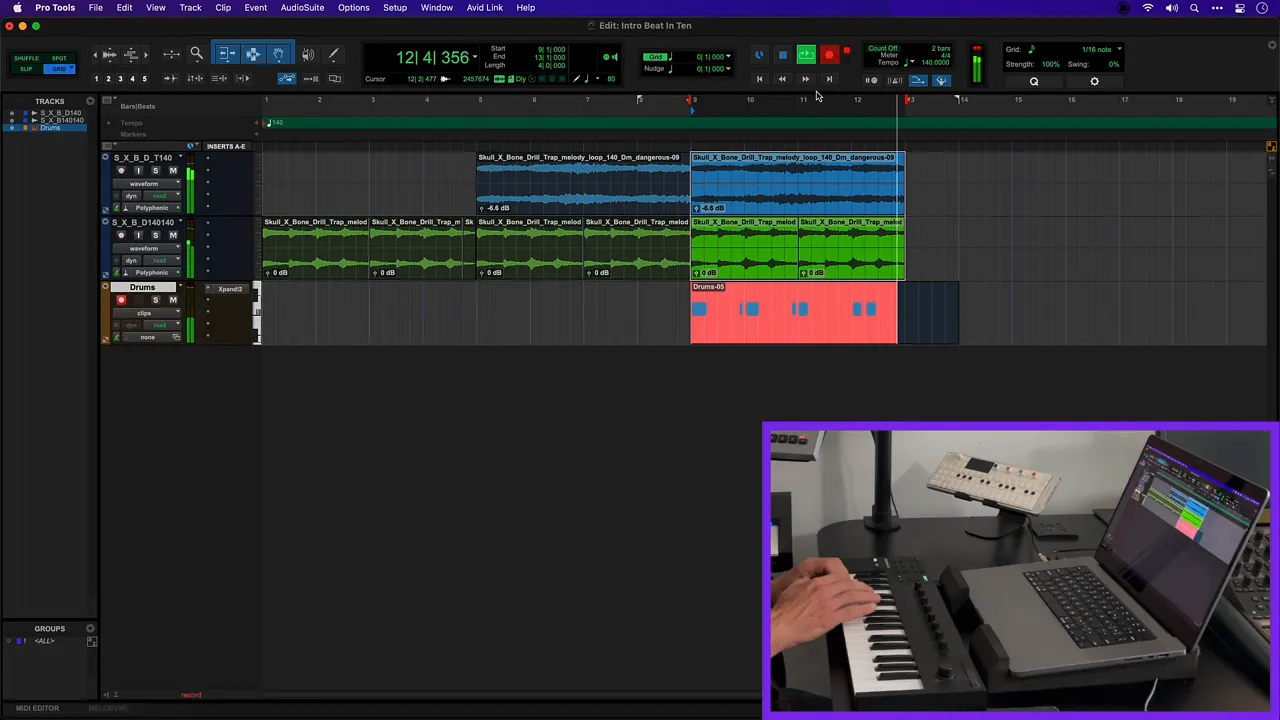
After recording, the instructor tidies the performance by quantizing to the nearest 16th using the Q key. This balances human feel with rhythmic tightness, which suits many modern beats.
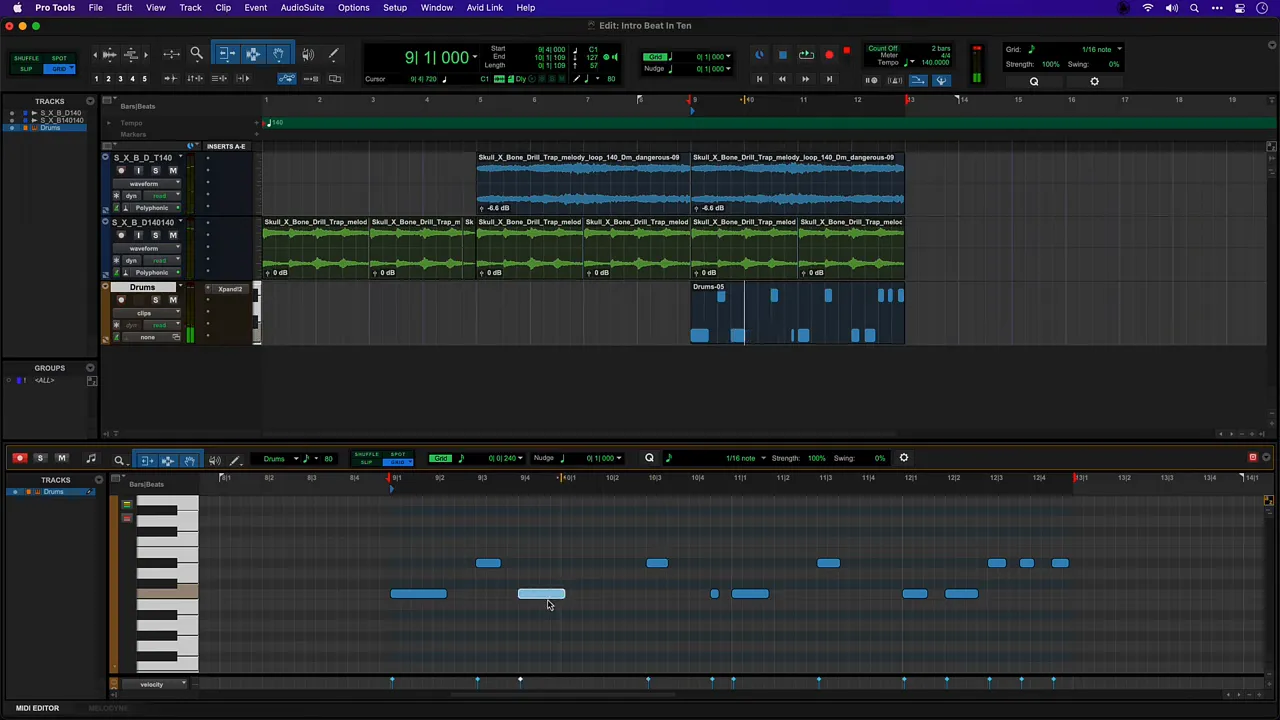
Further MIDI editing tips for Pro Tools For Beginners:
- Open the MIDI editor to nudge individual hits forward or back for groove adjustments.
- Use the pencil tool to draw in hits or delete notes with Option/Alt + click.
- Keep an overdub‑recording mindset — record multiple passes and comp the best parts together.
7. Adding character: harmonic and EQ plugins
To give the drums more impact, a harmonic plugin (Lo‑Fi in the demo) is inserted to add distortion and saturation. A small amount of EQ is then applied to sculpt the tone and remove unwanted frequencies. This chain increases perceived loudness and energy without adding significant level.
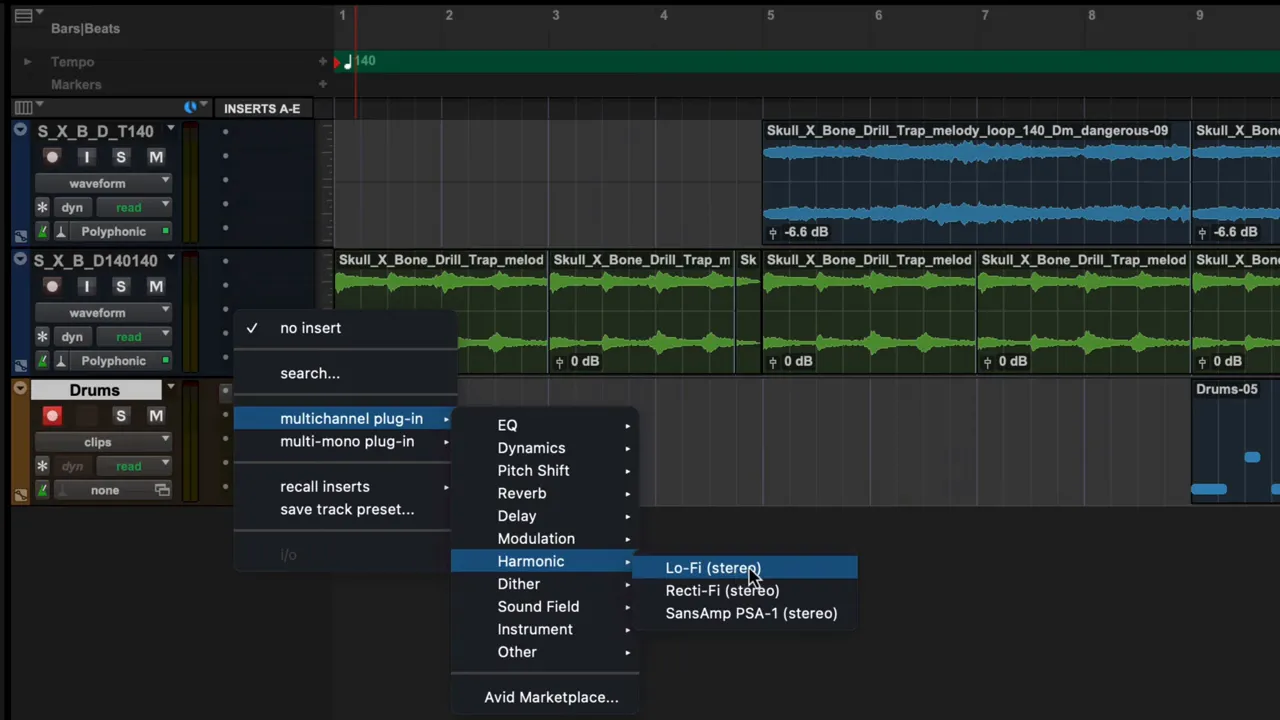
For Pro Tools For Beginners, remember:
- Saturation/harmonic distortion can make drums feel fuller even before compression.
- Always use EQ to remove clashing frequencies; this saves headroom for bass and vocals later.
- Subtle changes often sound more musical than extreme processing at this stage.
8. Crafting a sub bass with Expand
Next, the instructor creates another Instrument track and again uses Expand, this time selecting a synth‑bass preset from the “synth basses” category. The preset named “Dynamics” is used as a starting point and tweaked for a sharp attack and sub weight.
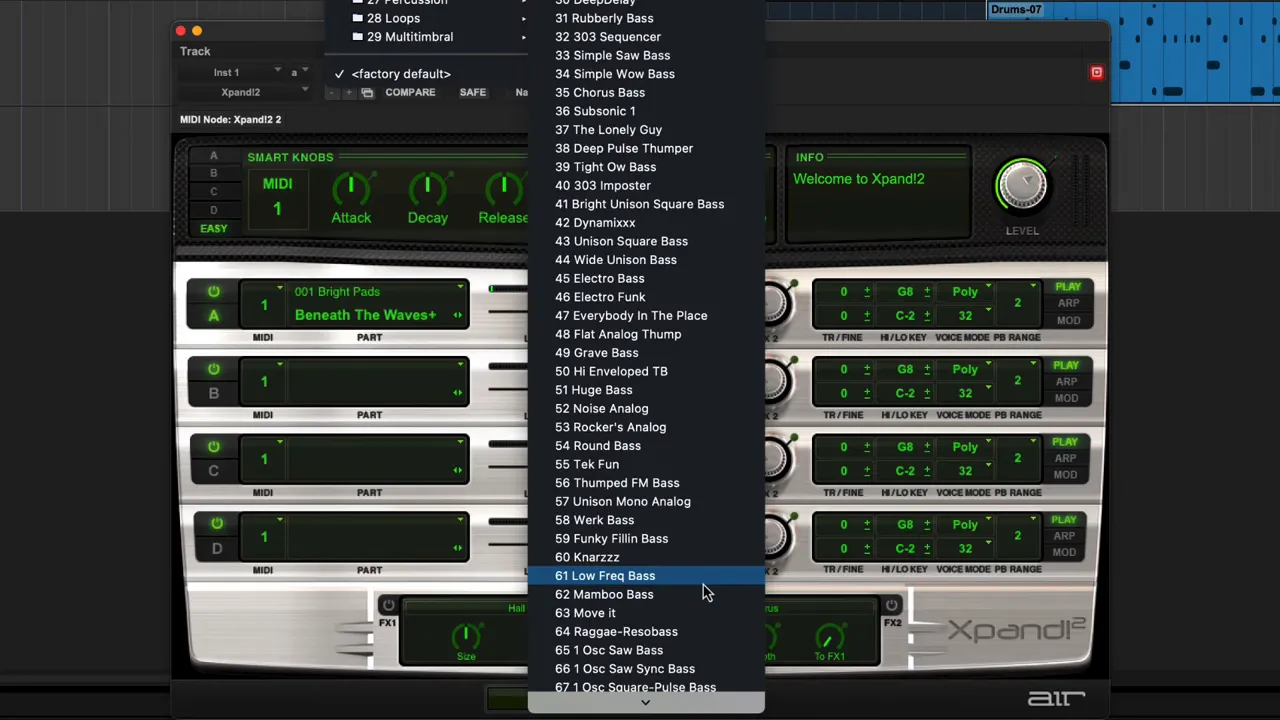
Recording the bass follows the same process as drums: arm the track, perform with a MIDI keyboard or draw MIDI notes, then quantize and adjust level balance in the mixer. The instructor emphasizes checking timing and levels to ensure the bass locks with the kick.
9. Structure and arrangement: creating space for vocals
With drums, loops and bass in place, the instructor sketches a basic arrangement suitable for collaboration with a vocalist. A few simple structural ideas are demonstrated:
- Intro with only a single loop or minimal elements to set the mood.
- Build by introducing drums after four bars and layering fill bars (snares or hat variations).
- Drop to a spare section (kick only or remove hats) where a vocalist could enter with space.
- Return to the full beat for the chorus or main hook.
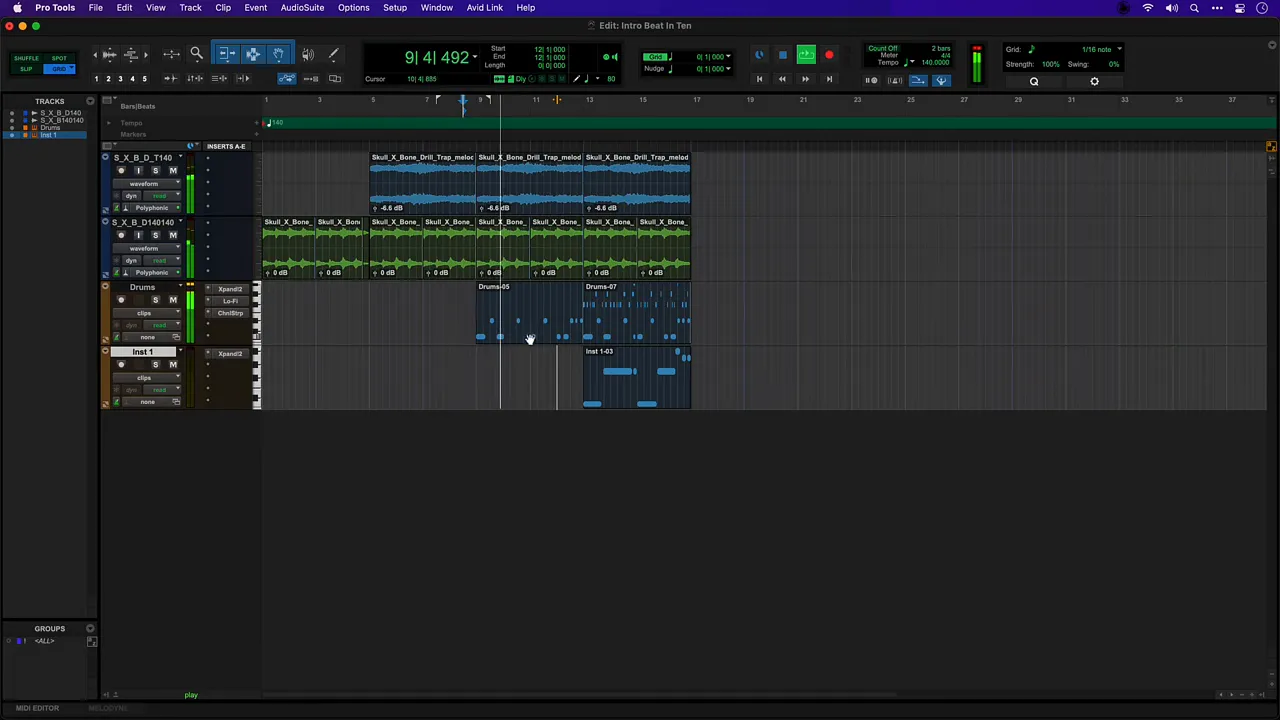
These arrangement moves are useful for Pro Tools For Beginners learning to think in terms of call‑and‑response and dynamic contrast — essential elements of modern production that keep listeners engaged.
10. Exporting and next steps
Once the arrangement is sketched and parts are balanced, the project is ready to be shared with collaborators or a vocalist. Exporting stems or a rough mix provides context and makes it easier for vocalists to perform over the beat.
Recommended next steps for Pro Tools For Beginners:
- Create a simple rough mix: level balance, a touch of master buss compression and a high‑pass to clean low rumble.
- Export individual stems for drums, bass, and the looped elements if collaborators prefer isolated tracks.
- Save session versions as you progress so you can revert to earlier arrangements.
Resources and recommended reading
For producers who want to expand beyond this workflow, here are some relevant resources and reading that provide deeper insight into beat making, sound design and mixing:
- Curated Videos & Articles On How To Make Beats: https://howtomakebeatsblog.com/
- Ramzoid 808 Cooker Plugin review — shaping low end for trap and bass music: https://howtomakebeatsblog.com/ramzoid-808-cooker-plugin-review/
- How Cymatic scaled to $364,000 — lessons on selling beats and building a production business: https://howtomakebeatsblog.com/how-cymatic-made-364000-last-month-being-full-time-producers/
- Trippie Redd vocal effect tutorial — processing vocals for dreamy textures: https://howtomakebeatsblog.com/trippie-redd-vocal-effect-tutorial/
Practical checklist for Pro Tools For Beginners
Use this quick checklist to reproduce the beat‑building process:
- Create a new session and enable Dynamic Transport, MIDI Merge and Edit Command Focus.
- Import loops and set the session tempo to match (e.g., 140 BPM).
- Use Option/Alt‑drag and Command/Ctrl‑D to duplicate and build structure quickly.
- Apply a clip‑based effect (AudioSuite) for creative transitions like a tape stop.
- Create Instrument tracks and load Expand for drums and bass.
- Tweak individual kit layers (reverb, tuning, modulation) inside the instrument.
- Record MIDI, quantize, and make small timing edits in the MIDI editor.
- Add harmonic saturation and EQ to thicken drums and free up frequency space.
- Arrange sections, leaving space for vocalists or additional instrumentation.
- Export stems or a rough mix for collaboration.
Common mistakes and how to avoid them
New producers often repeat the same pitfalls. Here are some corrections that will save time and maintain creative momentum:
- Avoid mixing loudness with arrangement: don’t overprocess early — get the arrangement sounding right first.
- Don’t rely on one element for groove — adjust note placement and humanize certain parts if everything is too rigid.
- When using instruments like Expand, tweak presets rather than leaving them untouched; small edits to tuning and reverb will make a preset original.
- Save versions frequently; this protects creative ideas and allows experimentation without losing earlier takes.
Frequently asked questions
What version of Pro Tools is best for a beginner?
Pro Tools Intro is a great place for Pro Tools For Beginners to start because it includes core features for recording, editing, and mixing along with bundled virtual instruments and an included loop library. It provides a low‑friction environment for learning session flow and plugin usage before moving to Pro Tools Standard or Ultimate as needs grow.
Do you need a MIDI keyboard to follow this workflow?
No, a MIDI keyboard is helpful and speeds up performance‑based recording, but Pro Tools For Beginners can use the on‑screen MIDI keyboard to play instruments or draw MIDI notes directly in the MIDI editor. The workflow remains the same: create an Instrument track, load Expand, then perform or program parts.
How important is matching loop tempo to the session tempo?
Matching loop tempo early keeps everything aligned and makes layering MIDI easier. If a loop’s tempo is known (for example, 140 BPM), setting the session to the same tempo avoids timing conflicts and ensures quantize and grid functions behave predictably for Pro Tools For Beginners.
Should new producers always quantize MIDI parts?
Quantize is a tool, not a rule. For Pro Tools For Beginners, quantizing to the nearest 16th or 8th can tighten parts quickly. However, preserving slight timing variations often yields more musical results — use quantize selectively and consider nudging notes manually to retain groove.
What plugins are essential for making beats in Pro Tools?
Essential tools include a virtual instrument (Expand or other VST/AAX synths), an EQ, a saturation/harmonic plugin and a compressor. For Pro Tools For Beginners, built‑in plugins and Expand provide plenty of capability to create beats without buying third‑party tools. As workflows mature, specialised plugins for sub processing (808 cookers), vocal tuning and advanced saturation become useful.
How do you prepare a track for a vocalist?
Create sections with dynamic contrast (intro, verse, drop) and leave space by removing competing elements in verses. Export a rough mix and separate stems if the vocalist prefers instrument isolation. For Pro Tools For Beginners, marking clear song sections and providing a click or tempo map helps vocalists perform confidently.
Final thoughts for Pro Tools For Beginners
The workflow shown is focused on speed and musicality: import loops, sketch structure, create drums and bass with virtual instruments, add character with simple effects, then prepare a basic arrangement for collaboration. Each step introduces practical shortcuts and decisions that will serve beginners well as they grow.
For readers wanting to dive deeper into beat production, the linked resources provide specialized guidance on low‑end processing, marketing and vocal effects. Practice this process a few times with different loop combinations and presets — repetition builds familiarity with Pro Tools’ interface and the Expand instrument, helping Pro Tools For Beginners develop a personal workflow that is both efficient and creative.
